Following are the instructions for setting up your site to resemble the Metro Pro theme demo.
You may wish to have the Metro Pro theme demo open for reference while setting up your theme. The setup documentation for this theme has been broken down into the following sections:
- Pre-Installation Setup
- Theme Installation
- How to Import Demo Content
- How to Configure the Genesis Theme Settings
- How to Set the Site Title Header Text
- How to Use a Custom Header Image
- How to Configure the Background Image
- How to Configure the Navigation Menus
- How to Configure the Secondary Navigation to Display Left Aligned Menu Item
- How to Configure the Home Page
- How to Configure the Primary Sidebar Area
- How to Configure the Secondary Sidebar Area
- How to Configure the Footer Widget Areas
- After Entry Widget Area
- How to Create a Blog Page
Pre-Installation Setup
Compatibility
Make sure you have the following installed:
- WordPress version 3.6+
- Genesis Framework version 2.0+
Plugins
Before you begin, you will need to install and activate the following plugins Of course, you may substitute your favorite plugin, but this is the one used in the Metro Pro theme demo:
How to Configure the Genesis Theme Settings
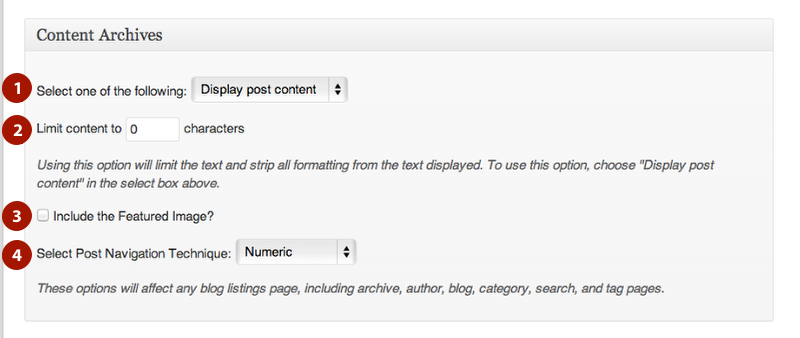
In your WordPress admin, navigate to Genesis > Theme Settings. Configure the Theme Settings as follows:
Default Layout
- Click a thumbnail to select the Default Layout. The Minimum Pro theme uses the Content > Sidebar option.

Content Archives
- For Content Archives, the default setting of “Display post content” is used by the demo.
- Leave the “Limit content to __ characters” option blank or set to 0.
- Leave “Include the Featured Image?” checkbox unchecked.
- Using the drop down box, select “Numeric” for the “Post Navigation Technique.”
Be sure to click the “Save Settings” button to preserve your changes.
How to Set the Site Title Header Text
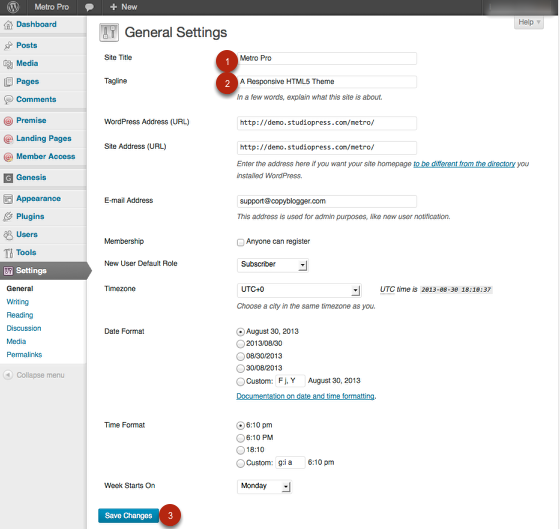
The site title and description for your site can be set by navigating to Settings > General.
- The Site Title will display in the upper left corner of your site.
- The Tagline Setting will not be displayed when using the Metro Pro Theme.
- Be sure to click the “Save Settings” button to preserve your changes.
How to Use a Custom Header Image
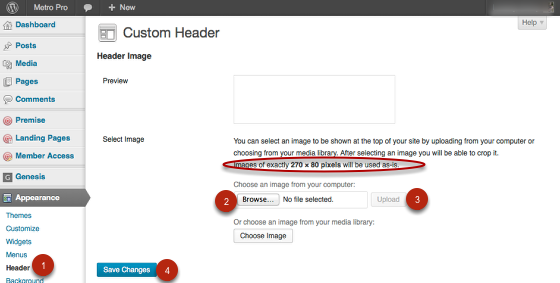
If you prefer a Logo Image rather than a text based SIte Title it is possible to use a small logo style image that will display in the upper left corner of the site.
- Navigate to Appearance > Header menu in your WordPress admin panel
- Click “Browse” and Navigate to the image you would like to use for a Logo. Images of exactly 270 × 80 pixels will give the best results. Other sizes will be cropped in the upload process to create an image of the correct size.
- Click “Upload” to copy the image from your computer to your website.
- Be sure to click the “Save Settings” button to preserve your changes.
How to Configure the Background Image
The Metro Pro theme demo displays an image behind the content area of the site.
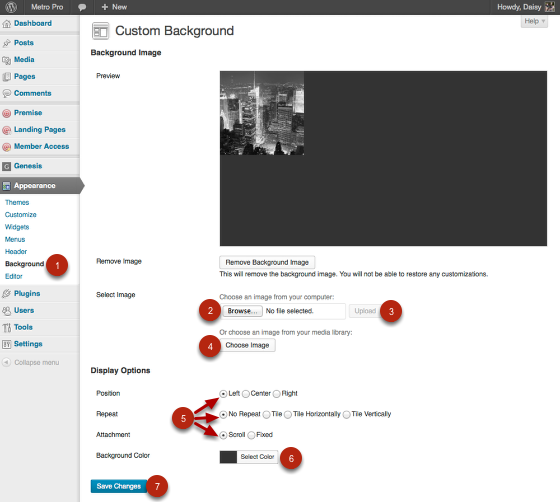
- Navigate to Appearance > Background in your WordPress admin panel.
- Use the “Browse” button to select the background image you wish to use from your computer.
- Once the image has been selected click the “Upload” button to load the image for use on your site.
- Alternatively you can use the “Choose Image” button to select the background image you have loaded to your site previously.
- The Display Options settings for Position, Repeat, and Attachemnt are not important for this theme. These settings will be ignored.
- To select a Background Color to show as the Background image Fades in click “Select Color” and choose a color or enter a color code. The theme demo uses #333333
- Click the “Save Changes” button to preserve your changes.
Note: This background image does not need to be a specific size since the theme is responsive and will crop, shrink, and grow the image as needed.
How to Configure the Navigation Menus
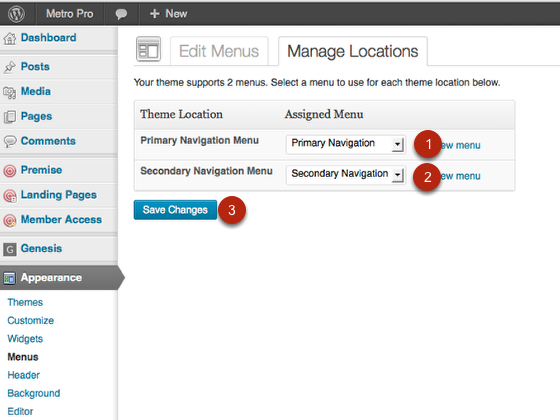
In the Metro Pro theme, both the Primary Navigation Menu and Secondary Navigation Menu areas are utilized. The menus assigned to the default navigation areas can be set by navigating to Appearance > Menus > Manage Locations.
- A Menu set in the Primary Navigation Menu location will display immediately below the header area of your site.
- A Menu set in the Secondary Navigation Menu location will display immediately above the header area of your site.
- Be sure to click the “Save Settings” button to preserve your changes.
How to Configure the Secondary Navigation to Display Left Aligned Menu Item
The Metro Pro theme demo has a split menu effect in the Secondary Navigation area with one navigation menu item aligned to the far left of the site while the remaining menu items are aligned to the right side.

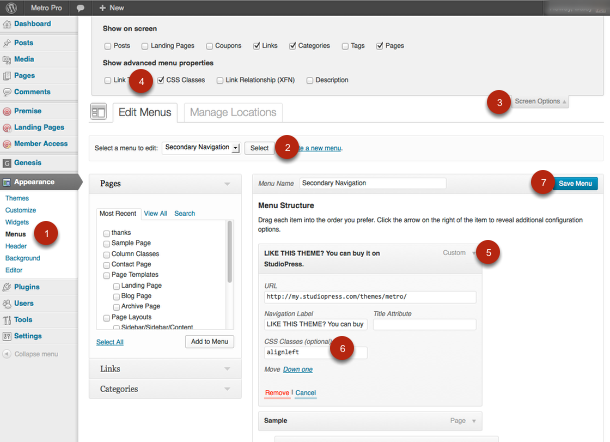
- Navigate to Appearance > Menus
- Select the Menu that will be used in the Secondary Navigation Menu location
- Expand Screen Settings to display additional display options
- Check “CSS Classes”
- Expland the First Menu Item in the Menu
- Enter a CSS Class of “alignleft”
- Be sure to click “Save Menu” to preserve your change
How to Configure the Home Page
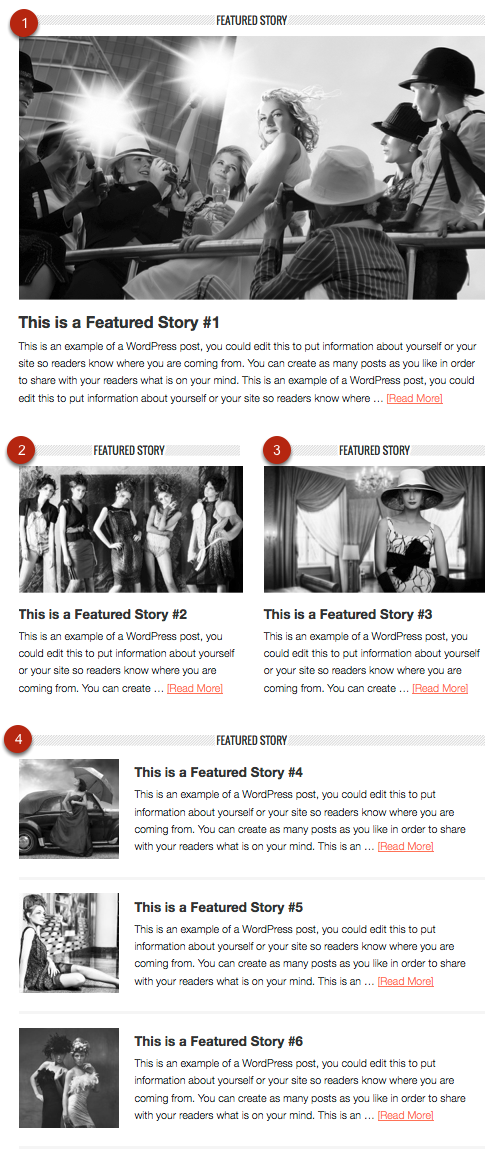
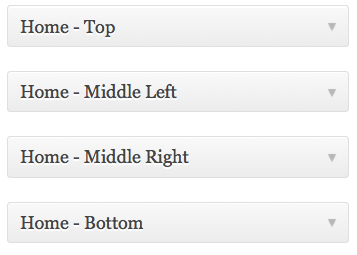
The Metro Pro theme demo home page is configured to display the most recent five posts from a category named Featured in a “magazine” style layout. Several widget areas are included in the Metro Pro theme and are designed to feature content in the Home – Top widget area most prominently.
- Home – Top: A single featured post with a large image and longer excerpt
- Home – Middle Left contains a single featured post with a medim sized sized featured image and shorter excerpt floated to the left of the content area.
- Home – Middle Right contains a single featured post with a medim sized sized featured image and shorter excerpt floated to the right of the content area.
- Home – Bottom contains featured posts with a thumbnail sized sized featured images and shorter excerpt displayed in a list format.
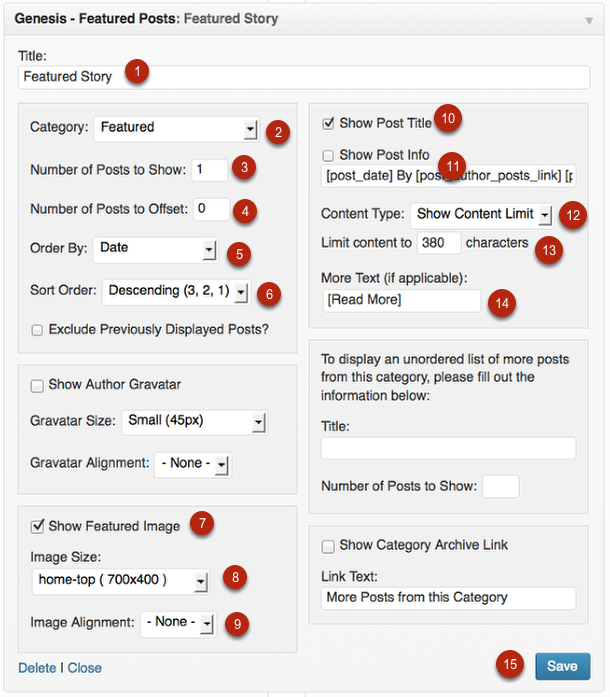
How to Configure the Home – Top Widget Area
- Title: Featured Story
- Category: Feautured
- Number of Posts to Show: 1
- Number of Posts to Offset: 0
- Order By: Date
- Sort Order: Descending (3, 2, 1)
- Show Featured Image: Yes
- Image Size: home-top (700×400)
- Image Alignment: None
- Show Post Title: Yes
- Show Post Info: No
- Content Type: Show Content Limit
- Limit content to 380 characters
- More Text: [Read More]
- Be sure to click the “Save” button to preserve your changes.
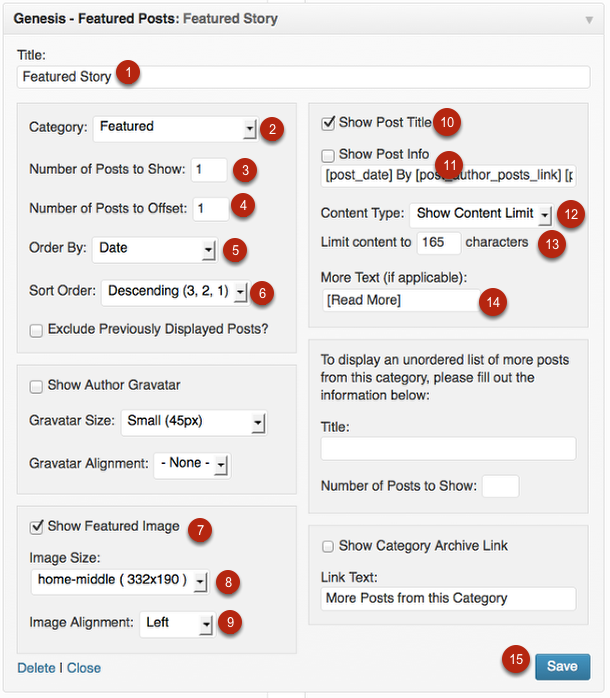
How to Configure the Home – Middle Left Widget Area
- Title: Featured Story
- Category: Feautured
- Number of Posts to Show: 1
- Number of Posts to Offset: 1
- Order By: Date
- Sort Order: Descending (3, 2, 1)
- Show Featured Image: Yes
- Image Size: home-middle (332×190)
- Image Alignment: Left
- Show Post Title: Yes
- Show Post Info: No
- Content Type: Show Content Limit
- Limit content to 165 characters
- More Text: [Read More]
- Be sure to click the “Save” button to preserve your changes.
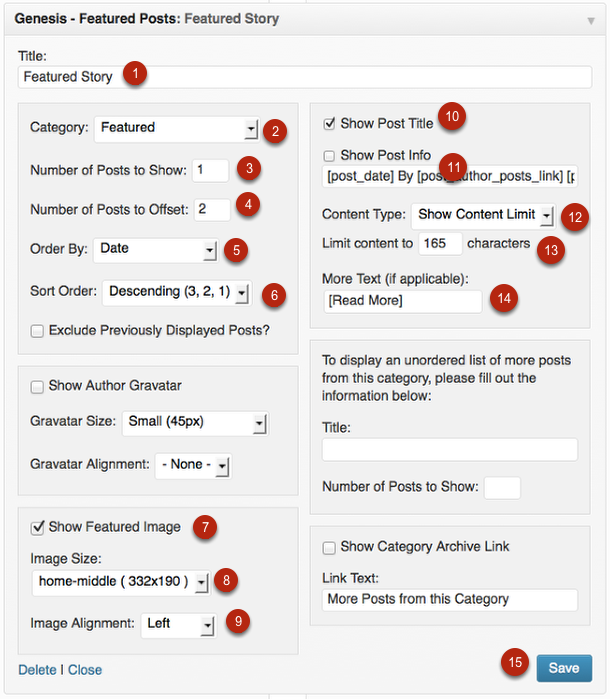
How to Configure the Home – Middle Right Widget Area
- Title: Featured Story
- Category: Feautured
- Number of Posts to Show: 1
- Number of Posts to Offset: 2
- Order By: Date
- Sort Order: Descending (3, 2, 1)
- Show Featured Image: Yes
- Image Size: home-middle (332×190)
- Image Alignment: Left
- Show Post Title: Yes
- Show Post Info: No
- Content Type: Show Content Limit
- Limit content to 165 characters
- More Text: [Read More]
- Be sure to click the “Save” button to preserve your changes.
How to Configure the Home – Bottom Widget Area
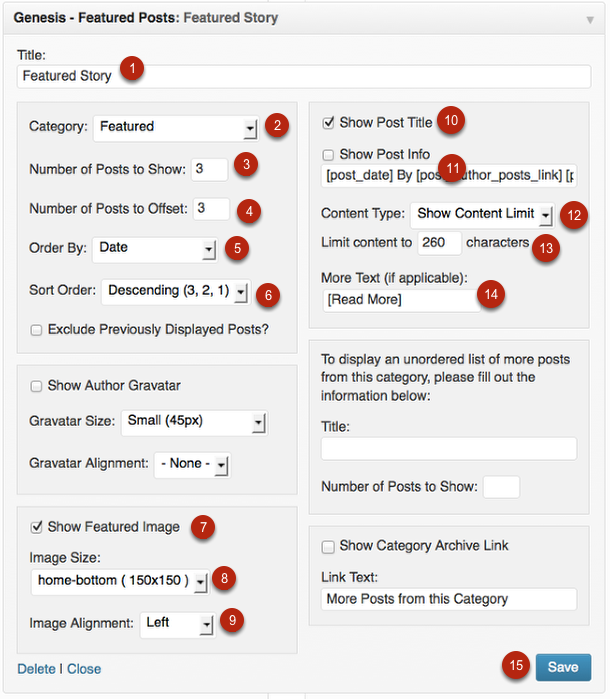
- Title: Featured Story
- Category: Feautured
- Number of Posts to Show: 3
- Number of Posts to Offset: 3
- Order By: Date
- Sort Order: Descending (3, 2, 1)
- Show Featured Image: Yes
- Image Size: home-bottom (150×150)
- Image Alignment: Left
- Show Post Title: Yes
- Show Post Info: No
- Content Type: Show Content Limit
- Limit content to 260 characters
- More Text: [Read More]
- Be sure to click the “Save” button to preserve your changes.
How to Configure the Primary Sidebar Area
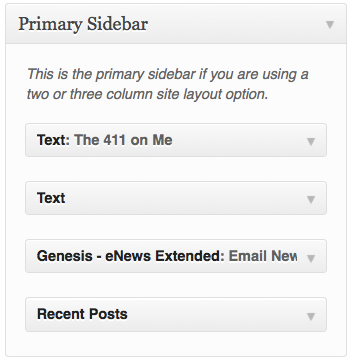
The following widgets are used in the Primary Sidebar area that displays to the right side of the content area.
- Text Widget
- Text Widget
- Genesis eNews Extended
- Recent Posts Widget
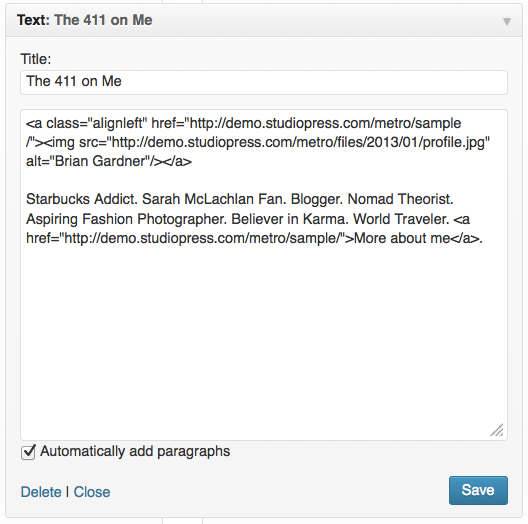
Text Widget Settings:
| <a class=“alignleft“ href=“http://demo.studiopress.com/metro/sample/“><img src=“http://demo.studiopress.com/metro/files/2013/01/profile.jpg“ alt=“Brian Gardner“/></a> | |
| Starbucks Addict. Sarah McLachlan Fan. Blogger. Nomad Theorist. Aspiring Fashion Photographer. Believer in Karma. World Traveler. <a href=“http://demo.studiopress.com/metro/sample/“>More about me</a>. |
Be sure to click the “Save” button to preserve your changes.
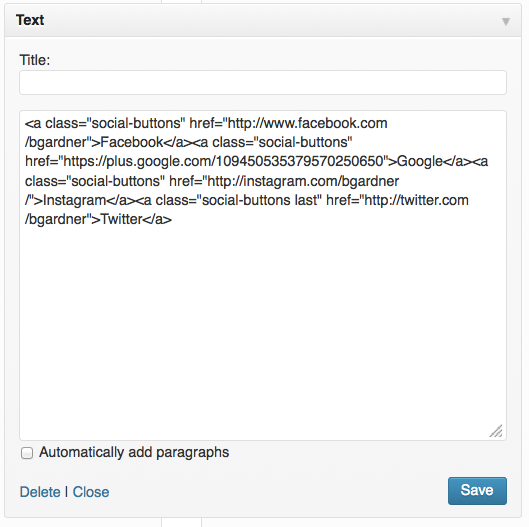
Text Widget Settings:
| <a class=“social-buttons“ href=“http://www.facebook.com/bgardner“>Facebook</a><a class=“social-buttons“ href=“https://plus.google.com/109450535379570250650“>Google</a><a class=“social-buttons“ href=“http://instagram.com/bgardner/“>Instagram</a><a class=“social-buttons last“ href=“http://twitter.com/bgardner“>Twitter</a> |
Be sure to click the “Save” button to preserve your changes.
Genesis eNews Extended Widget Settings:
Be sure to click the “Save” button to preserve your changes.

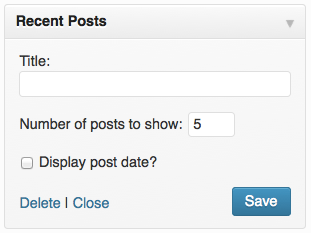
Recent Posts Widget Settings:
Be sure to click the “Save” button to preserve your changes.
How to Configure the Secondary Sidebar Area
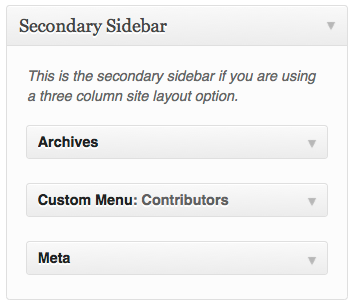
The Metro Pro theme demo uses a 3 column layout on pages other than the home page.
- Archives Widget
- Custom Menu Widget
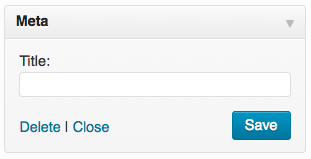
- Meta Widget
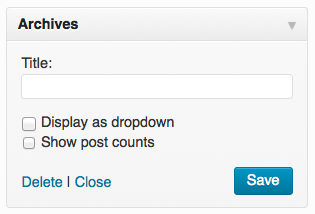
Archives Widget Settings
Be sure to click the “Save” button to preserve your changes.
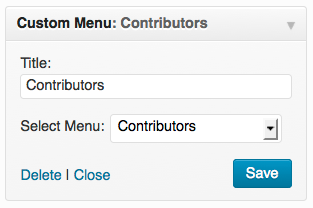
Custom Menu Widget Settings
Be sure to click the “Save” button to preserve your changes.
Meta Widget Settings
Be sure to click the “Save” button to preserve your changes.
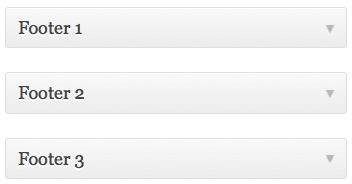
How to Configure the Footer Widget Areas
The Metro Pro theme demo uses the included 3 Footer Widget areas.
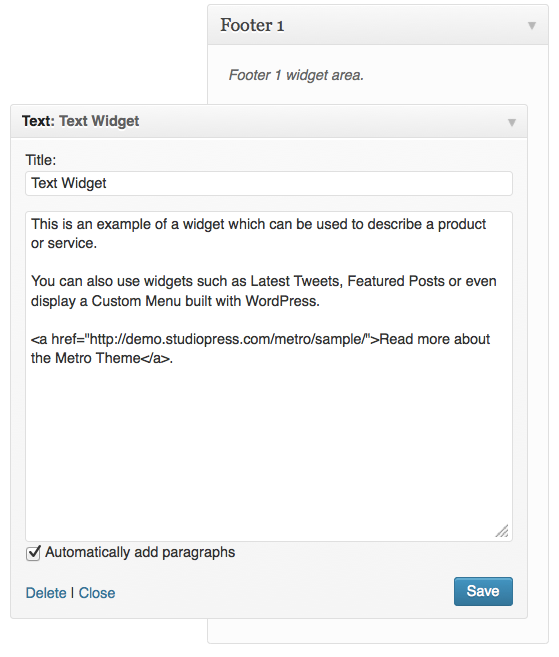
Footer 1 Widget Area:
- Text Widget
Be sure to click the “Save” button to preserve your changes.
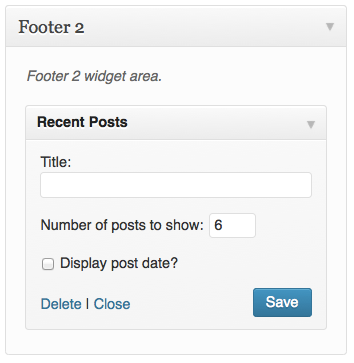
Footer 2 Widget Area Settings:
- Recent Posts Widget
Be sure to click the “Save” button to preserve your changes.
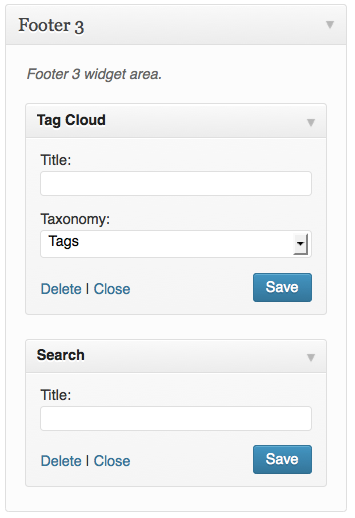
Footer 3 Widget Area Settings:
- Tag Cloud Widget
- Search Widget
Be sure to click the “Save” button to preserve your changes.
After Entry Widget Area
An additonal widget area is included and will display on Single Posts after the content and before the Author Box and Comments area when widgets are added to the area.
How to Create a Blog Page
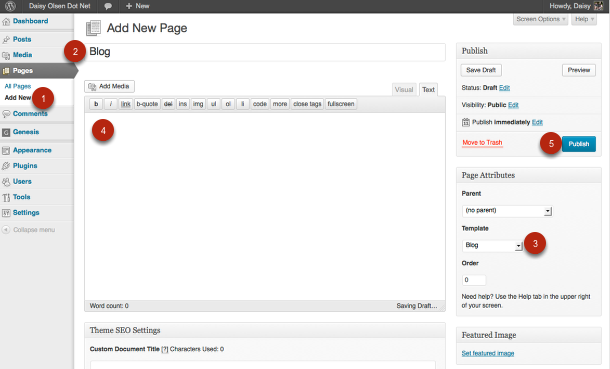
When using a widgetized home page it can be helpful to create a general blog style page to display elsewhere on your site. For instructions on how to create this page follow the following steps:
- Navigate to Pages > Add New in your WordPress Admin Panel
- Create a New Page named “Blog”
- In the right sidebar of the Page edit screen select the Blog option in the template dropdown menu.
- Leave the Content of this page blank, it will not be displayed when using the Blog page template.
- Publish the page.
Once the page has been published you can view the page to see a blog style list of recent posts. Link to this page in the custom menu of your choice.
