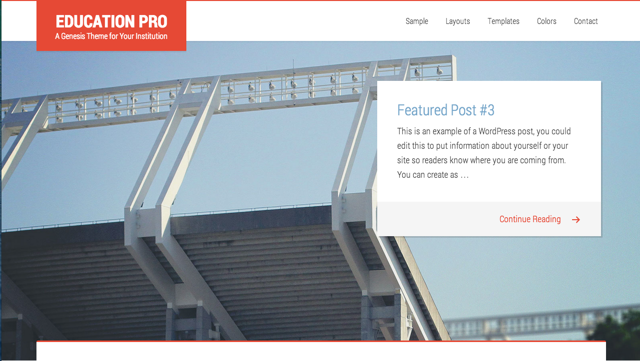
These instructions show you how to setup and use the Essence Pro theme to mimic the demo site.
The setup documentation for this theme has been broken down into the following sections:
- First Steps
- Pre-Installation Setup
- Activating the Theme
- Import Sample Content (Optional)
- Customize Your Theme Settings
- Homepage Setup
- Widget Areas
- Page Templates
- Extras
- AMP (Accelerated Mobile Pages)
- Author Box on Single Posts
- Author Page
- Blog Page
- Columns Page
- 2-Column Full Width Content Layout on Archive Pages
- Contact Page
- Header Background Images for Single Posts and Pages
- Header Search
- Image & Font Guide
- “Intro” Paragraph Style
- More Tag
- Pricing Page
- WooCommerce Shop
- How Do I Change…?
Pre-Installation Setup
Compatibility
Compatibility
The Essence Pro theme requires the following:
- Latest version of WordPress
- Latest version of the Genesis Framework
- PHP version 7.1+ (already installed for your use)
Plugins to Install
Below are all the plugins that are being used on the Essence Pro theme demo site. They are all optional, but if you’d like to set up your site like the demo, you’ll need to install and activate them before you begin.
You may substitute your favorite plugins for these, if you wish.
General Plugins
- Genesis Blocks: This plugin adds a collection of content blocks for the Gutenberg block editor.
- WPForms Lite: This plugin is a drag-and-drop form builder that allows you to easily create contact forms.
Note: If you choose to use the One-Click Theme Setup feature, these plugins will be automatically installed and activated for you.
Activating the Theme
After you’ve chose the Essence Pro theme, you’re ready to activate the child theme. It is not necessary to activate the Genesis Framework theme as it will run quietly in the background.
To activate your child theme, log in to your WordPress dashboard, and go to Appearance > Themes. There you will see screenshots of the themes that are available for you to use. Hover over the screenshot of the theme you wish to activate and click the Activate button.
Import Sample Content (Optional)
For your convenience, we’ve provided a way for you to import sample content to give you a head start with building your site. If you already have existing content on your site, or if you wish to build everything on your own, you can skip this step.
One-Click Theme Setup
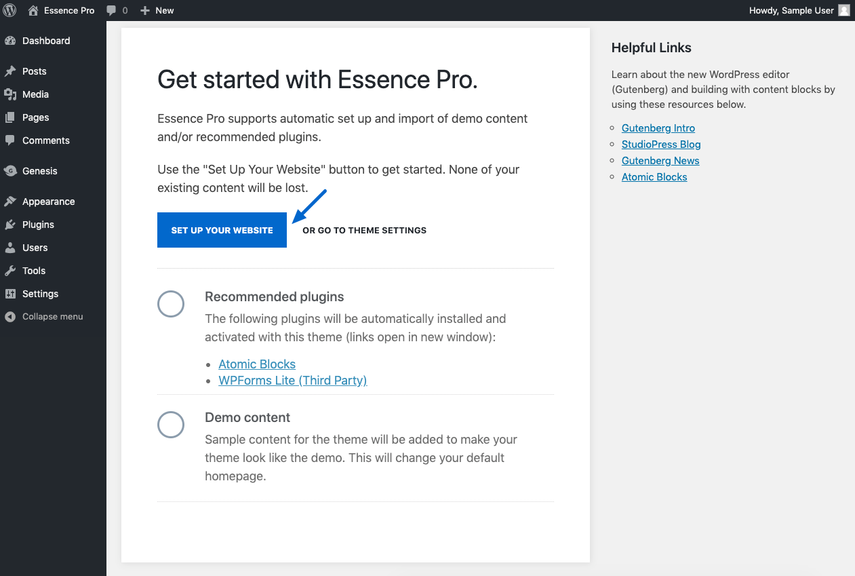
After activating Essence Pro (and only if you’re using WordPress 5.0+ and Genesis 2.8+), you’ll be directed to a theme setup page where you’ll be given the option to automatically set up the site as well as import demo content and the recommended plugins.
Click the Set Up Your Website button (shown in the image below) to get started.
Notes:
- A new page named Live The Life You Deserve will be automatically created and assigned as the static homepage on your site. If you already have a static homepage assigned on your site, your original page will not be overwritten in this process. It will, however, be automatically unassigned as the static homepage.
- If the site is brand new, sample posts will be imported during this process. However, if it’s an existing site, no posts will be imported.
- The demo’s widget areas will not be automatically imported during the one-click theme setup process. You’ll need to add content to them manually. See the following articles in the Widget section for details.
- Front Page Featured Widget Area
- After Content Featured Widget Area
- Footer CTA Widget Area
Sample Images
If you wish to obtain images for your site that are similar to what’s seen on the demo, you may check some of the stock photo sites:
Photography for purchase:
Note: The Essence Pro theme folder contains a README.txt file which contains a list of the sample images (and their sources) used in the theme demo.
Theme Settings Overview
Using the WordPress Customizer, you can edit your child theme’s options and preview your changes before publishing them to your live site.
Once you’ve activated a child theme, you’ll see several default WordPress settings and some Genesis-specific settings in the customizer. The available settings will vary depending upon which child theme is activated.
To get started, go to Appearance > Customize to access the customizer:

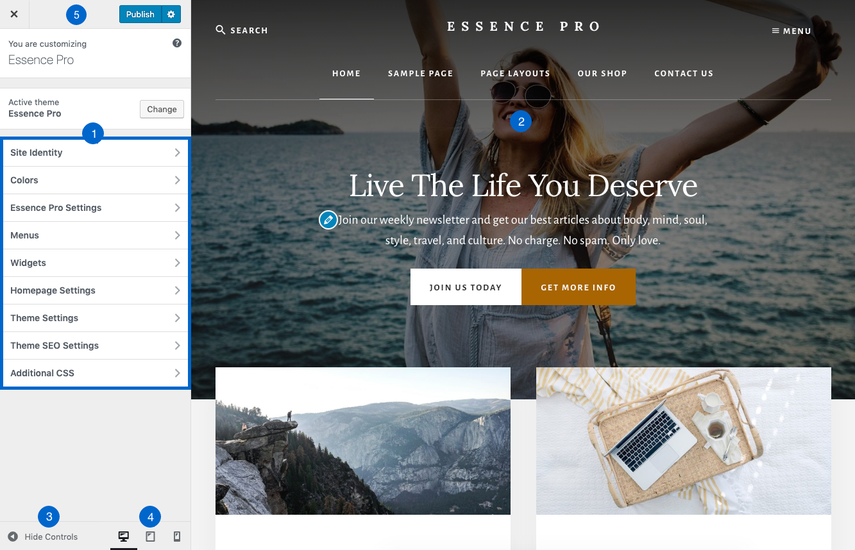
Once the customizer is open, you’ll see a menu on the left and a preview of your site on the right, as shown below.
- Customizer Menu: On the left side of the screen, you’ll see the customizer menu which shows the various options that are available for editing in your theme. The exact options available depend upon which theme you’ve activated. To see the settings available within each option, click the title to open the expanded view.
- Live Preview: On the right side of the screen, you’ll see a live, interactive preview which allows you to test each option in your theme. All changes will appear as you select them, but they will not be applied to your site until you click Publish.
- Hide Controls: To hide the customizer menu and see the interactive preview in full screen mode, click Hide Controls in the lower left corner of the menu panel.
- Device Icons: To see the interactive preview in various device widths, click the device icons in the lower right corner of the menu panel.
- When you are finished making all your changes, click the Publish button. If you decide you do not want to save the changes you’ve made, click the X located to the left of that button to close the editor and dismiss your changes.
Site Identity
Go to Appearance > Customize > Site Identity to upload a Logo and set the Site Title, Tagline and Site Icon for your site.
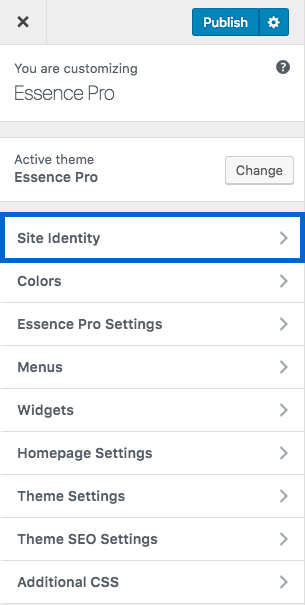
The available settings are described below.
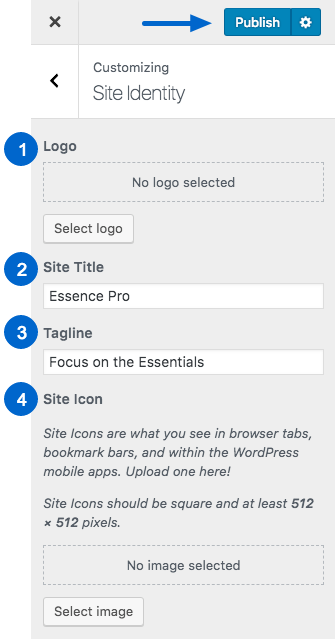
- Logo: The logo image is flexible in height and width so you may upload an image of any size. However, the default display size is 600 x 160 pixels. To make sure the logo image remains crisp on retina screens, we recommend uploading an image that is at least double the display size. Note: To keep your site running smoothly and quickly, we recommend uploading an image with a file size of 120kb or smaller.
- Site Title: If you do not upload a logo image, the site title will be displayed in the site header.
Note: The logo or site title will be displayed in the center of the site header if there is a menu added to the Off Screen Menu location (see Menus). If there isn’t a menu assigned to that location, the logo or site title will be displayed on the left side of the site header.
- Tagline: The tagline will not be displayed on the site.
- Site Icon: The site icon (or favicon) will be displayed in the browser tab when viewing your site (as shown in the image below). Click Select Image to upload your site icon.
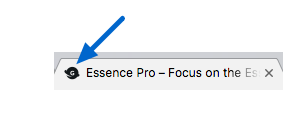
Be sure to click Publish to preserve your changes.
Colors
The Essence Pro theme includes the option to change the colors of some of the elements within the theme.
Go to Appearance > Customize > Colors to change the colors, if desired.
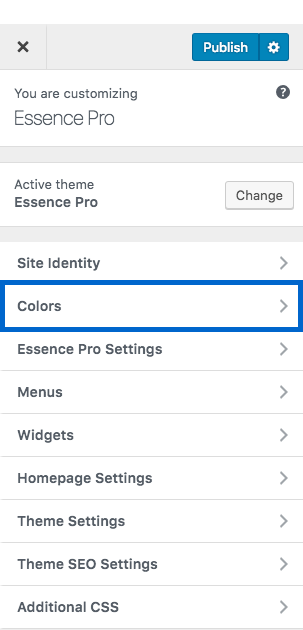
Click Select Color to reveal the color picker and choose a new color.
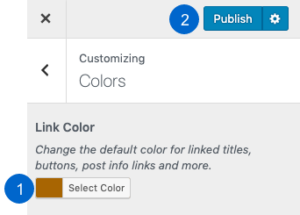
- The Link Color will be applied to linked titles, buttons, post info links, buttons, and more.
- Click Publish to preserve your setting.
Note: The Essence Pro theme includes a color contrast detector to help make text easier to read depending upon the colors you select. For example, if you choose a light Link Color, the button text will automatically be changed to dark gray. If you choose a dark Link Color, the button text will automatically be changed to white. Color contrast is an important aspect of accessibility access in websites.
Essence Pro Settings
The Essence Pro theme includes various options that allow you to enable or disable specific settings on your site, as well as customize the default text and header background image that appear on the front page.
Go to Appearance > Customize > Essence Pro Settings to get started.
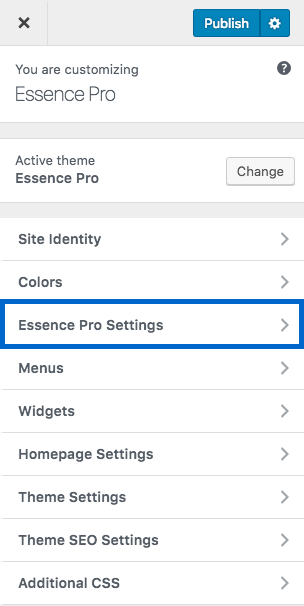
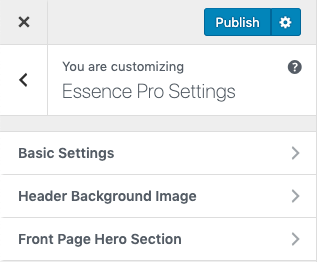
After opening the Essence Pro Settings, you’ll see three areas that can be configured for this theme:
- Basic Settings
- Header Background Image
- Front Page Hero Section
How To Configure The Default Page Layout
The Education Pro theme uses the Content > Sidebar option in the theme demo for all site pages except the home page.
The default page layout of Content > Sidebar will be set by default when the Education Pro Theme is activated.
An alternative Default Layout can be selected from the available options shown below:

How To Configure The Content Archives
The following defaults will be set upon Activation of the Education Pro theme:
- For Content Archives, the default setting of Display post excerptsis used by the demo.
- Include the Featured Image:Leave unchecked.
- Post Navigation Technique:Select Numeric in the drop down box.
Be sure to click the Save Settings button to preserve your changes.
Site Title Header Text
The site title and description for your site can be set by navigating to Settings > General.

- TheSite Title will display in the upper left corner of your site.
- TheTagline will not be displayed in the header in the AgentPress Pro theme.
Be sure to click the Save Changes button at the bottom of the page to preserve your changes.
Custom Header Image
Uploading a New Header Image
If you prefer a Logo Image rather than a text-based Site Title, it is possible to use a small logo image that will display in the upper left corner of the site.
- Navigate to Appearance > Headerin your WordPress admin panel.
- ClickBrowse, and navigate to the image you would like to use for a Logo.
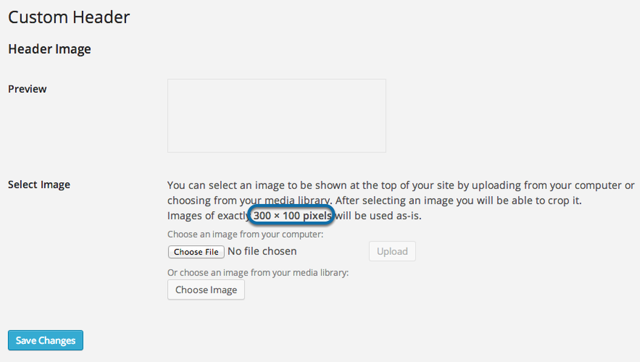
Note: Images of exactly 300×100 pixels will give the best results. Other sizes will be cropped in the upload process to create an image of the correct size.
- ClickUpload to copy the image from your computer to your website.
Be sure to click the Save Changes button to preserve your changes.
Selecting an Image from the Media Library
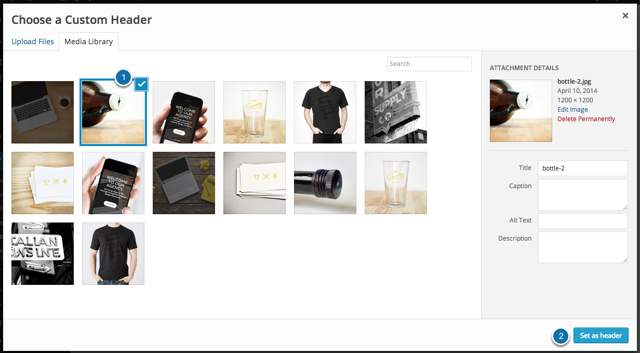
To select an image that has been previously uploaded to the WordPress media Library click the “Choose Image” button on the Custom Header screen.
- Navigate or Search for the Image you wish to use as your header and click on the thumbnail of the chosen image to select.
- Click the Set as Header button to return to the Custom Header screen. The selected image will be shown on the screen.
Be sure to click the Save Settings button at the bottom of the page to preserve your changes.
How To Use A Custom Background Image Or Color
The Education Pro theme can be configured to display an image or color behind the content area of the site.
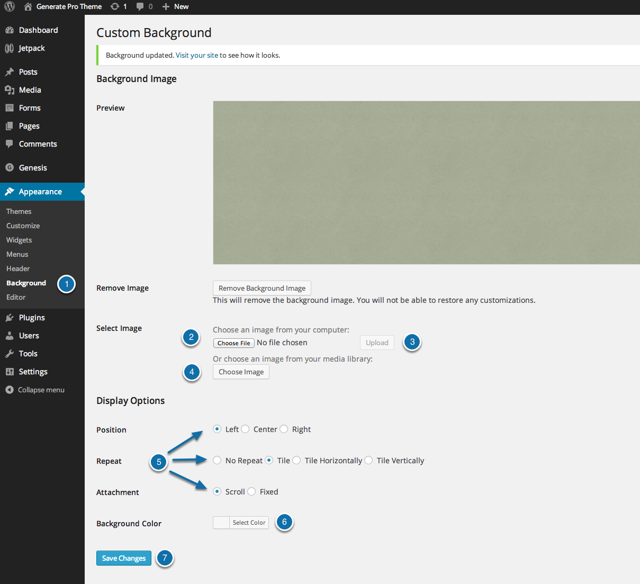
- Navigate to Appearance > Background in your WordPress admin panel.
- Use the “Choose File” button to select the background image you wish to use from your computer.
- Once the image has been selected click the “Upload” button to load the image for use on your site.
- Alternatively you can use the “Choose Image” button to select the background image you have loaded to your site previously.
- The Display Options settings for Position, Repeat, and Attachemnt can be set depending on the optimal settings for the image you have chosen.
- To select a Background Color to show around, or instead of a background image in click “Select Color” and choose a color or enter a hexidecimal color code.
- Click the “Save Changes” button to preserve your changes
Navigation Menus
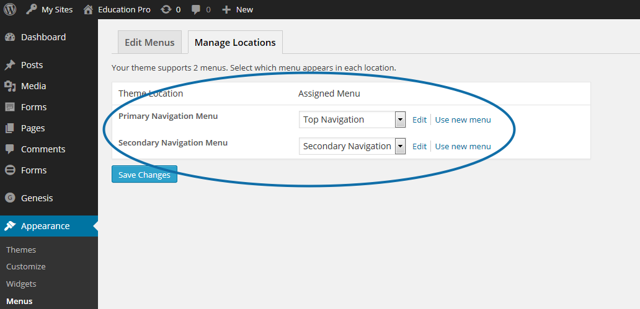
The Education Pro theme demo uses the Primary and Secondary Navigation menu locations.
The default navigation menus can be set by navigating to Appearance > Menus > Manage Locations. Set each navigation menu to a previously created menu of your choice.
- A Menu set in the Primary Navigation Menu location will display above the header areaon all pages except pages using the Landing Page Template.
- A Menu set in the Secondary Navigation Menu location will display in the footer areaon all pages except pages using the Landing Page Template.
- A Menu set using a Custom Menu Widget in the Header Right Widget area will display on all pages except pages using the Landing Page Template.
To disable a menu from showing, choose the “Select a Menu” option in the drop down.
Be sure to click the “Save Settings” button to preserve your changes.
Optionally, you can use a custom menu placed in the right side of the header by using the Custom Menu Widget in the Header Right Widget Area.
Navigate to Appearance > Menus and create a new menu. Add your menu items, then save the menu.
Navigate to Appearance > Widgets. Click the Custom Menu widget title bar, select the Header Right sidebar, and click Add Widget.
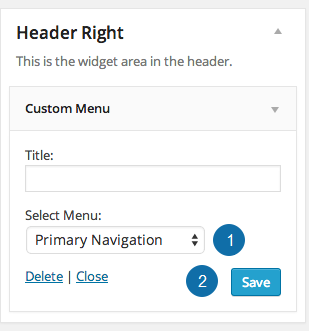
- In the widget settings, choose the custom navigation menu you created from the list in the drop down.
- Click theSave button to preserve your changes.
You are here: My StudioPress / Setup / Education Pro Theme / Home – Featured Widget Area
Home – Featured Widget Area
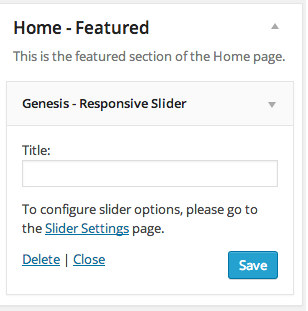
The Home – Featured Widget Area in the Education Pro theme displays a sliding display of recent posts using the Genesis Responsive Slider plugin.
The Genesis Responsive Slider widget is used to in the theme demo to display a sliding view of several featured posts.
Go to Appearance > Widgets, click on the Genesis – Responsive Slider widget title bar, select the desired widget area from the list, and click Add Widget.
To configure the widget, click the title bar to open it, and click the Slider Settings link to access the settings for this plugin.
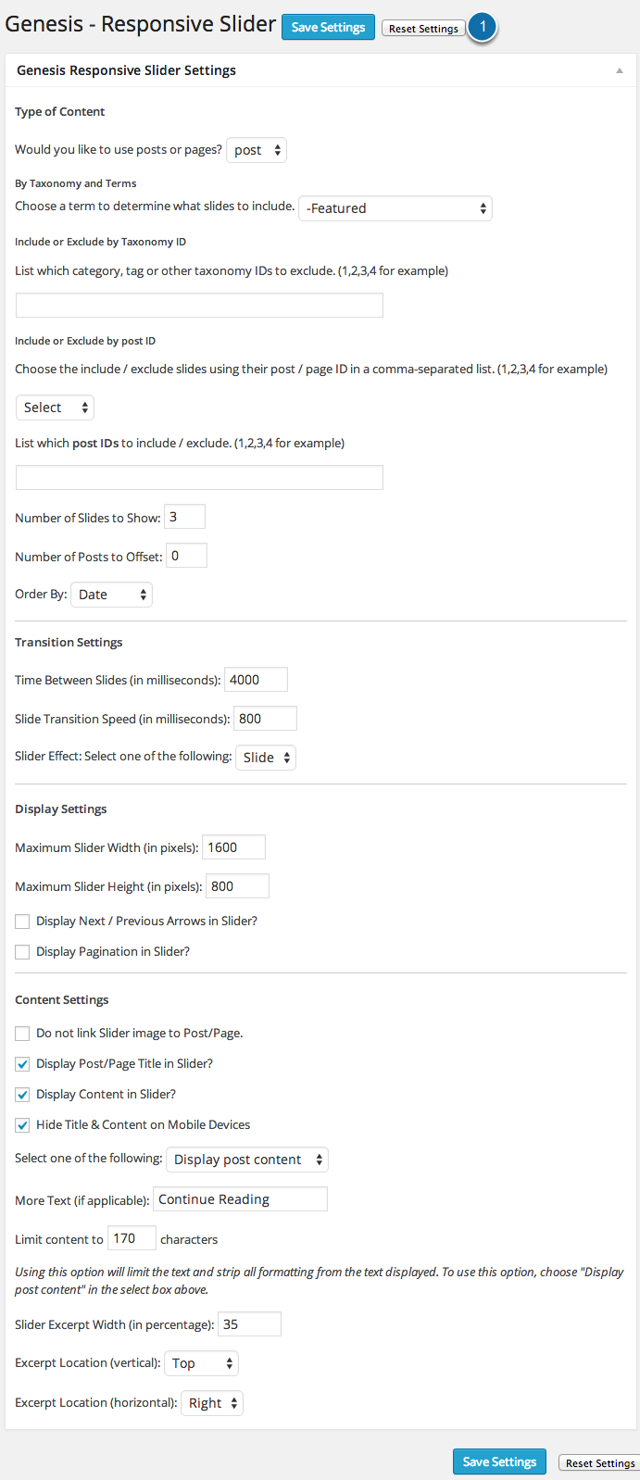
To automatically set the default values used by the Education Pro Theme Demo(recommended) click the Reset Settings button.
Once you have completed the widget configuration, be sure to click Save at the bottom of the widget to preserve your settings.
Home – Top Widget Area
The Home – Top Widget Area in the Education Pro theme displays content just below the Home – Featured Widget area (Slider)

A Text widget is used to in the theme demo to display a welcome message for your website.
Go to Appearance > Widgets, click on the Text widget title bar, select the desired widget area from the list, and click Add Widget.
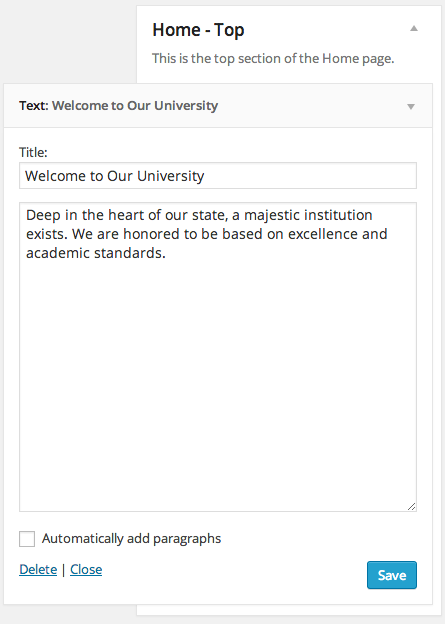
- Title:Optional, can be left blank. The theme demo uses Welcome to Our University
- Content:Use the content of your choice as seen above.
Once you have completed the widget configuration, be sure to click Save at the bottom of the widget to preserve your settings.
Home – Middle Widget Area
The Home – Middle Widget Area in the Education Pro theme displays content just below the Home – Top Widget area(Welcome Message.)

The Home – Middle Content Area optionally displays after the Featured Content Slider on the Home Page.
The Education Pro Theme Demo uses Four Text Widgets in this area:

The content in each of the four(4) Text widgets in the Home – Middle widget area as seen in the Education Pro theme demo is as follows:
Once you have completed the widget configuration, be sure to click Save at the bottom of the widget to preserve your settings.
Home – Bottom Widget Area
The Home – Bottom Widget Area in the Education Pro theme displays content just below the main Content area which displays recent posts and the Primary sidebar. This is a perfect place to input a special message, or a Call To Action to subscribe to your email list.

The Genesis eNews Extended widget is used to in the theme demo to display a form to subscribe to your mailing list for email updates.
Go to Appearance > Widgets, click on the Genesis – eNews Extended widget title bar, select the desired widget area from the list, and click Add Widget.
To configure the widget, click the title bar to open it, and change the settings to the following:
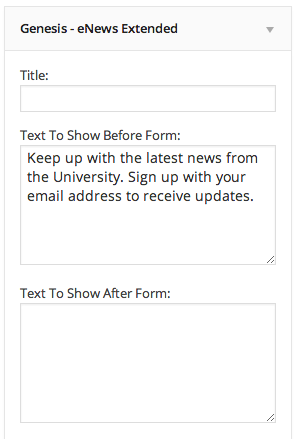
- Title:Optional, can be left blank.
- Text To Show Before Form:Include the text you wish to display The theme demo uses Keep up with the latest news from the University with our newsletter. Sign up with your email address to receive updates about our academic and athletic achievements.
- Text To Show After Form:Include the text you wish to display. Note: Due to the design, this text will also show to the left of the form.
The next section of the widget contains the fields necessary to connect your form to the subscription service you wish to use, according to the configuration instructions.
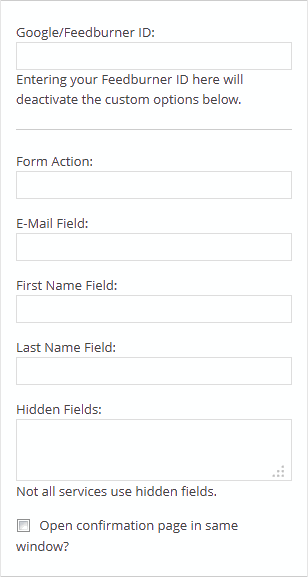
The bottom section of the widget allows you to change the text you that displays in the form fields, as well as changing the label of the form submit button.
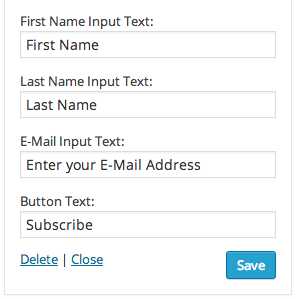
Once you have completed the widget configuration, be sure to click Save at the bottom of the widget to preserve your settings.
Primary Sidebar
The following widgets are used in the Education Pro Theme Demo Primary Sidebar area that displays to the right of the content area.
- Genesis Featured Page Widget
- Search Widget
- Recent Posts Widget
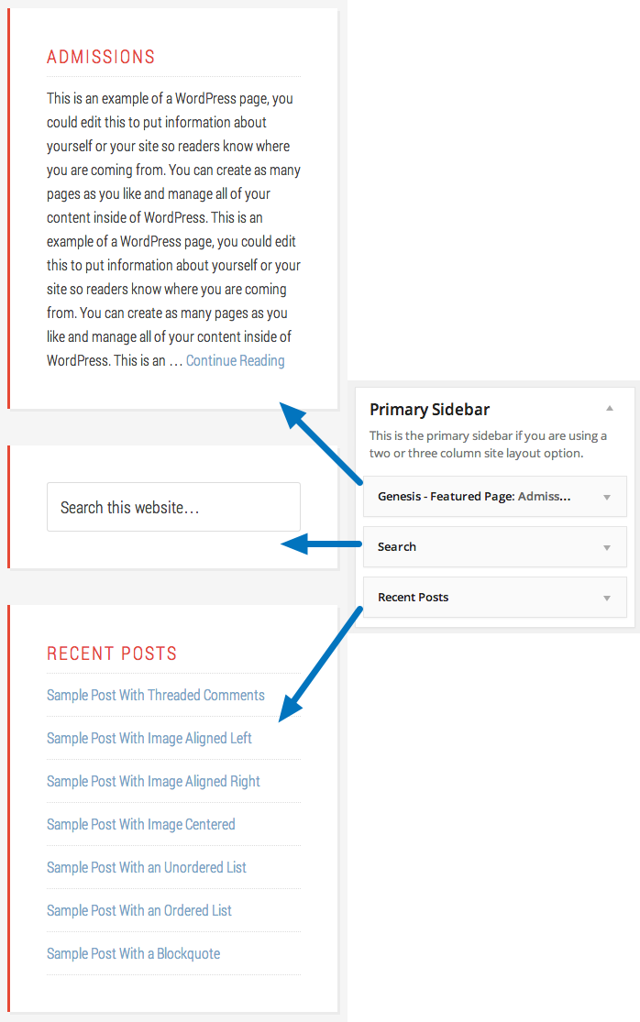
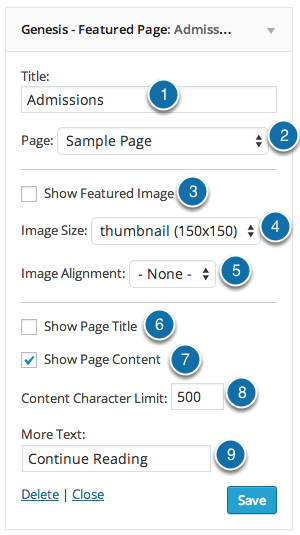
Genesis – Featured Page Widget
- Title:Choose title of your choice. The Education Pro theme demo uses “Admissions“
- Page:Select page of your choice
- Show Featured Image:Leave unchecked
- Image Size:thumbnail (150×150)
- Image Alignment:none
- Show Page Title:Leave Unchecked
- Show Page Content:Check Box
- Content Character Limit:500
- More Text:Continue Reading
Once you have completed the widget configuration, be sure to click Save at the bottom of the widget to preserve your settings.
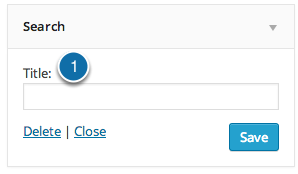
Search Widget
- Leave the Title field Blank.
Once you have completed the widget configuration, be sure to click Save at the bottom of the widget to preserve your settings.
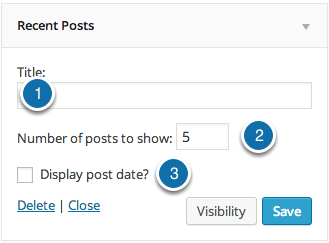
Recent Posts Widget
- Title:The title you wish to display, such as Recent Posts.
- Number of Posts:The number of post links you wish to display.
- Display post date:Whether to display the post date for each post link.
Once you have completed the widget configuration, be sure to click Save at the bottom of the widget to preserve your settings.
Footer Widget Areas
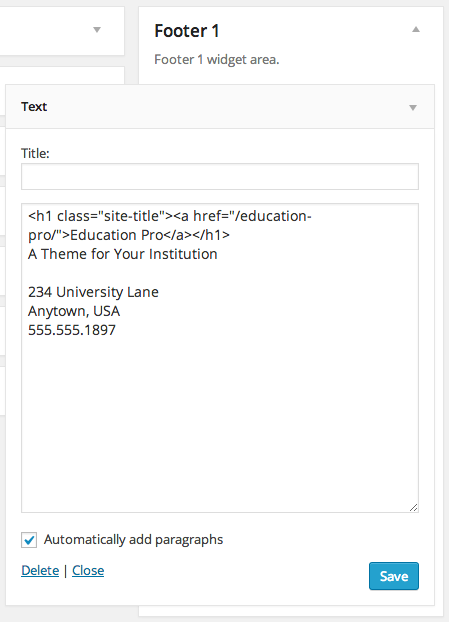
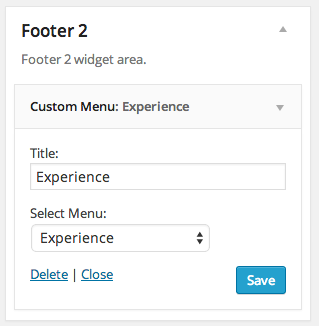
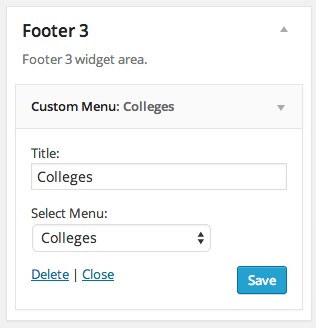
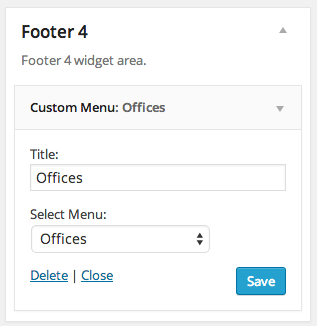
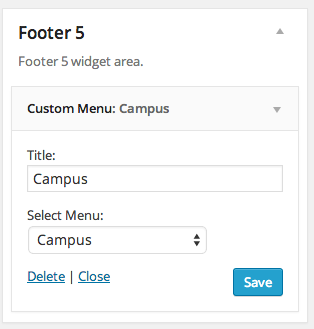
The Education Pro theme demo includes five (5) optional content areas that will display in the footer area of the site when widgets are added to the individual Footer Content Areas.
You can add your desired widgets under Appearance > Widgets.
Note: A widget must be used in Footer 1 to display the footer widgets section.

Footer 1
Footer 2
Footer 3
Footer 4
Footer 5
Once you have completed the widget configuration, be sure to click Save at the bottom of the widget to preserve your settings.
After Entry Widget Area
The After Entry Widget Area displays on Single Posts, after the Post Content and before Comments. In the Education Pro Theme Demo, the Genesis eNews Extended widget is used to display a secondary call to action after each post.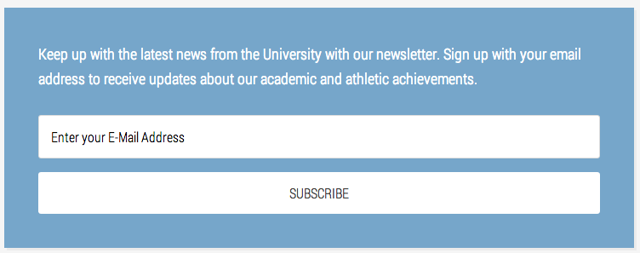
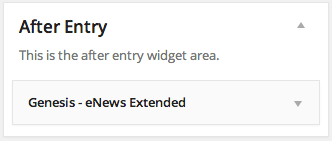
Go to Appearance > Widgets, click on the Genesis – eNews Extended widget title bar, select the desired widget area from the list, and click Add Widget.
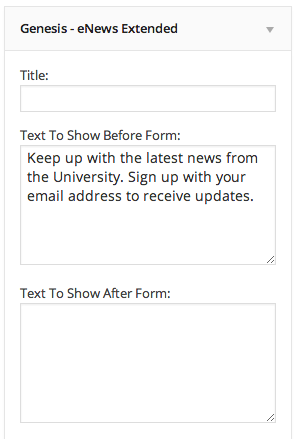
- Title:Optional, can be left blank.
- Text To Show Before Form:Include the text you wish to display The theme demo uses Keep up with the latest news from the University with our newsletter. Sign up with your email address to receive updates about our academic and athletic achievements.
- Text To Show After Form:Include the text you wish to display. Note: Due to the design, this text will also show to the left of the form.
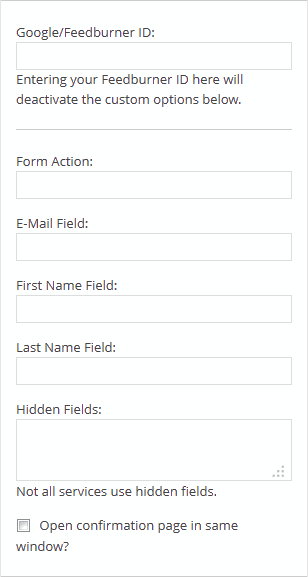
The next section of the widget contains the fields necessary to connect your form to the subscription service you wish to use, according to the configuration instructions.
The bottom section of the widget allows you to change the text you that displays in the form fields, as well as changing the label of the form submit button.
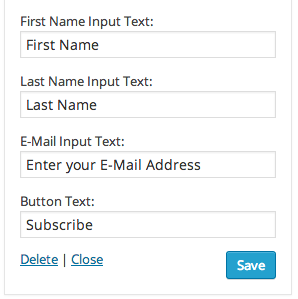
Once you have completed the widget configuration, be sure to click Save at the bottom of the widget to preserve your settings.
Blog Page Template
The Blog Page Template can be used to create a page to display your posts.
To use the template, create a new page in your WordPress admin. You may call it Blog, or a different name, such as News.
You will leave the content area of the page blank.
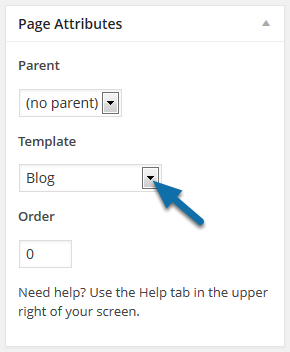
In the page editor, select the Blog template from the drop down in the Page Attributes box in the right sidebar, then click Publish.
Next, go to Genesis > Theme Settings > Blog Page Template, and configure the content you wish to display on this page.
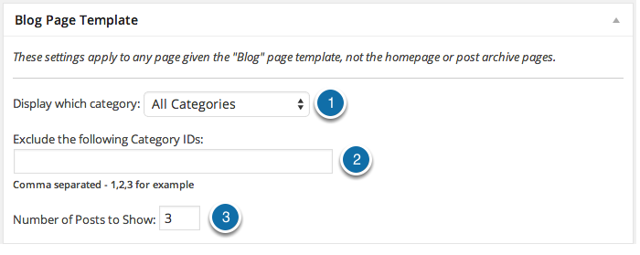
- You may choose to display All Categories, or a single category, using the drop down.
- You may choose to exclude one or more categories by including the category IDs in the input field.
- You may also choose how many posts you wish to display on this page. Note: This setting is different from theBlog pages show at most setting on Settings > Reading.
Once you have completed your configuration, make sure you click Save Settings at the bottom of the page to preserve your changes.
You may wish to add a link to this page in your navigation menu so your site visitors can find it.
Archive Page Template
The Archive Page Template is used to create a page to display a list of your site pages, and your post archives by category, month, author, and recent.
To use the template, create a new page in your WordPress admin. You may call it Archive, or any name you wish.
You will leave the content area of the page blank.
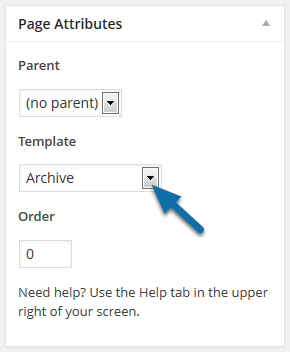
In the page editor, select the Archive template from the drop down in the Page Attributes box in the right sidebar, then click Publish.
You may wish to add a link to this page in your navigation menu so your site visitors can find it.
Landing Page Template
The Landing Page Template is used to create a full-width landing page with no header image.
To use the template, create a new page in your WordPress admin. You may call it whatever you wish.
You will enter the content in the editor that you wish to display on the page.
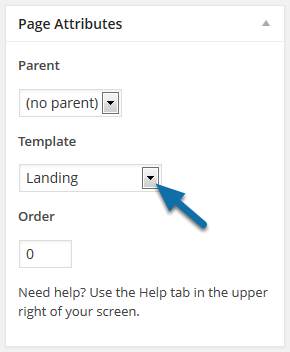
In the page editor, select the Landing template from the drop down in the Page Attributes box in the right sidebar, then click Publish.
You may wish to add a link to this page in your navigation menu so your site visitors can find it.
Column Classes
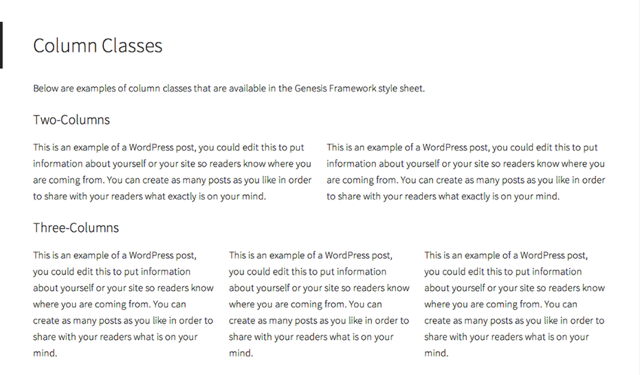
The following image demonstrates how column based content can be displayed on your site.
This type of structured content may be used in posts, pages and inside text widgets to structure content such as that often seen in a welcome message or call to action banner.
How to Use Content Column Classes
In Genesis we have added the ability to create columns (column classes). Below you find instructions on how to use content column classes.
2-Columns
To add two columns of text, enter the text below into your post/page editor:
3-Columns
To add three columns of text, enter the text below into your post/page editor:
4-Columns
To add four columns of text, enter the text below into your post/page editor:
6-Columns
To add six columns of text, enter the text below into your post/page editor:
How Do I Change…?
The Genesis Simple Edits plugin can help you customize the post info, post meta, and footer credits text

