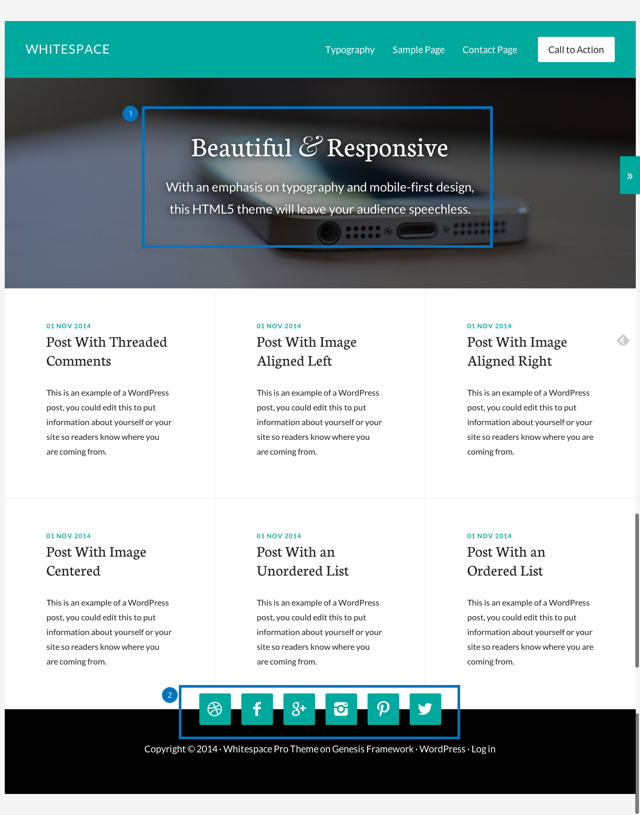
You may wish to have the Whitespace Pro theme demo open for reference while setting up your theme.
The setup documentation for this theme has been broken down into the following sections:
- First Steps
- Pre-Installation Setup
- Genesis Theme Settings
- Genesis Theme Settings
- Site Title Header Text
- Color Settings
- Custom Header Image
- Background Image
- Navigation Menus
- Home Page Setup
- Homepage Backstretch Image
- Home Page Layout
- Home Welcome Widget Area
- Footer Social Widget Area
- Other Widgets and Widget Areas
- After Entry Widget Area
- Page Templates
- Blog Page Template
- Archive Page Template
- Landing Page Template
- Extras
- Column Classes
- How Do I Change…?
Pre-Installation Setup
Compatibility
Make sure you have the following installed:
- WordPress version 3.8+
- Genesis Framework version 2.1+
Plugins
Before you begin, you will need to install and activate the following plugin used in the Whitespace Pro demo:
You may substitute your favorite social plugin for this plugin, if you wish.
Genesis Theme Settings
Accessing The Genesis Theme Settings
Next, you will configure the settings for the color style, default page layout, and content archives.
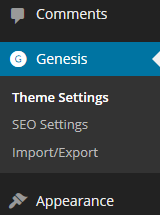
To access the theme settings, navigate to Genesis > Theme Settings in your WordPress admin.
Genesis Theme Settings Overview
The Genesis Theme settings screen consists of a number of Genesis Specific settings.
- Information – Displays information and update notification options for the Genesis Framework.
- Default Layout – Determines site-wide layout for posts, pages, and archive views. The theme may override this setting for the home page and alternative settings can be used on a per page, post, or archive basis.
- Navigation – When a WordPress Menu has been previously created the option to display “Navigation Extras” on the Primary navigation area will display here.
- Breadcrumbs – Breadcrumbs guiding users back, incrementally, to your home page can be configured to display on different content types.
- Comments and Trackbacks – Comments and Trackbacks can be completely disabled for Posts or Pages. Existing Comments and Trackbacks will continue to display. This is a global settings and cannot be overridden at the post or page level.
- Content Archives – Controls the display options for Date, Category, Tag, Taxonomy, and Author archive views.
- Blog Page Template – Controls the display options for Pages using the Blog Page Template.
- Header and Footer Scripts – Add site-wide scripts to the header or footer of your site. Often used for statistical tracking scripts from third party services.
Areas with specific settings when using the Whitespace Pro Theme are outlined in more detail below:
How To Configure The Default Page Layout
The Whitespace Pro theme uses the Full Width option in the theme demo for all site pages. All other layout options are disabled for this theme.
How To Configure The Content Archives
The following defaults will be set upon Activation of the Whitespace Pro theme:
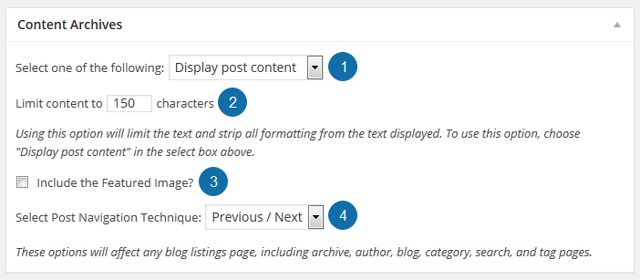
- For Content Archives, the default setting of Display post content is used by the demo.
- Limit content to __ characters: Set it to 150.
- Include the Featured Image: Leave the box unchecked.
- Post Navigation Technique: Select Previous/Next in the drop down box.
Other options can be set optionally.
Be sure to click the Save Settings button to preserve your changes.
Site Title Header Text
The site title and description for your site can be set by navigating to Settings > General.
Be sure to click the Save Changes button at the bottom of the page to preserve your changes.
Color Settings
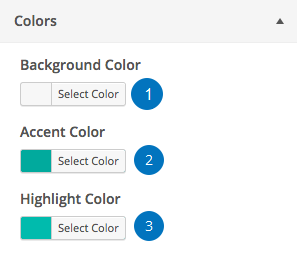
The Whitespace Pro theme comes with the option to change the colors of some elements used within the theme.
- A Background color can be set to display a color of your choice behind the main content area of your site.
- An Accent color can be set to display a color of your choice for the Header background, Links, Buttons, and the hover color for featured posts on the home page.
- A Highlight color can be set to display a color of your choice for the button hover color and menu border.
Be sure to click the Save & Publish button to preserve your changes.
Custom Header Image
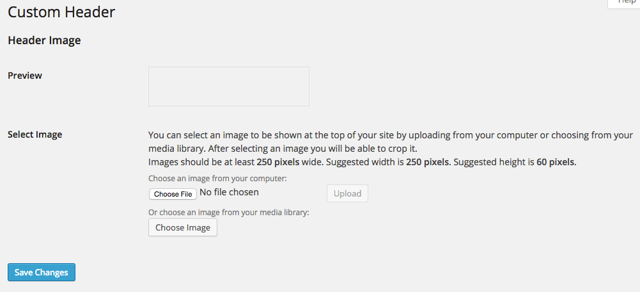
Uploading a New Header Image
If you prefer a Logo Image rather than a text-based Site Title, it is possible to use a small logo image that will display in the upper left corner of the site.
- Navigate to Appearance > Header in your WordPress admin panel.
- Click Browse, and navigate to the image you would like to use for a Logo.
Note: Images of exactly 250×60 pixels will give the best results. Other sizes will be cropped in the upload process to create an image of the correct size.
- Click Upload to copy the image from your computer to your website.
Be sure to click the Save Changes button to preserve your changes.
Selecting an Image from the Media Library
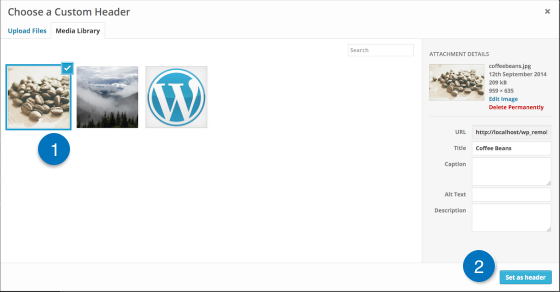
To select an image that has been previously uploaded to the WordPress media Library click the “Choose Image” button on the Custom Header screen.
- Navigate or Search for the Image you wish to use as your header and click on the thumbnail of the chosen image to select.
- Click the Set as Header button to return to the Custom Header screen. The selected image will be shown on the screen.
Be sure to click the Save Settings button at the bottom of the page to preserve your changes.
Background Image
The Whitespace Pro theme allows you to upload a custom background image, if desired.
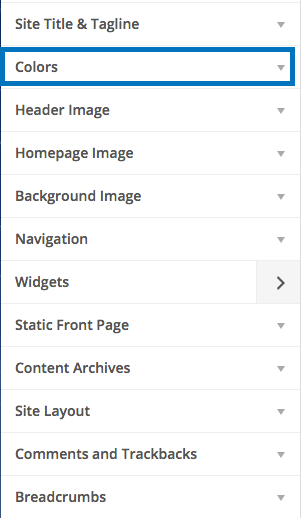
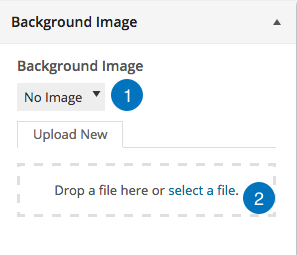
To upload a background image, you can navigate to Appearance > Customize > Background Image.
- To set an image to be displayed as the site’s background click the arrow to display the option to upload a new image for use in this area.
- To select a file to upload from your computer click the “select a file” link. A popup will display allowing you to navigate to the image of your choice using your computer’s file navigation tool.
- To remove an image that is currently configured as the Background Image click the “Remove Image” link (not shown)
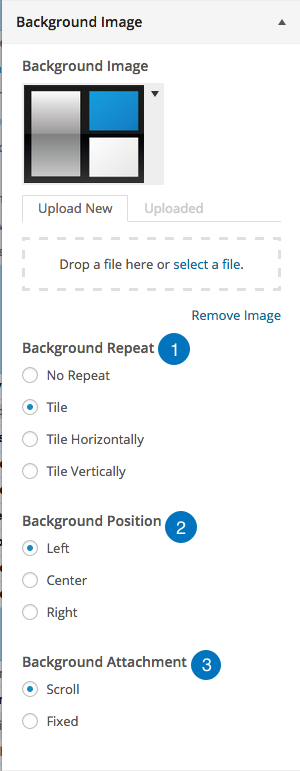
Once an image has been uploaded additional settings will be available to determine how the image will be displayed in the background.
- Background Repeat – Determines if the image will repeat as a tiled background or as a single non-repeating image.
- Background Position – Determines the position of a non-repeating background.
- Background Attachment – Determines if the image will scroll out of view as the user goes down the page or will remain in view.
Be sure to click the Save & Publish button to preserve your changes.
Navigation Menus
Only the Primary Navigation menu area is used in the Whitespace Pro theme demo.
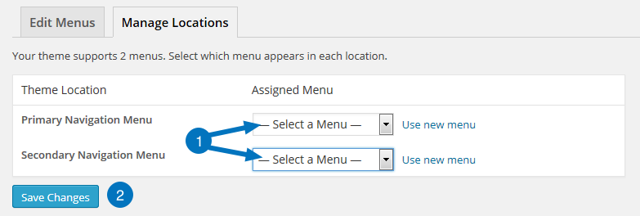
The default navigation areas can be disabled by navigating to Appearance > Menus > Manage Locations or toAppearance > Customize > Navigation.
The Primary Navigation menu will display on the right side of the site header.
- To disable the Navigation Menu locations, set both the Primary and Secondary navigation to the Select a Menuoption in the drop down.
- Be sure to click the Save Changes button to preserve your changes.
Add a Call To Action Button in the Navigation
The Whitespace Pro demo has a Call To Action button as the last item in the Primary Navigation. Here’s how you can add one to your navigation menu.
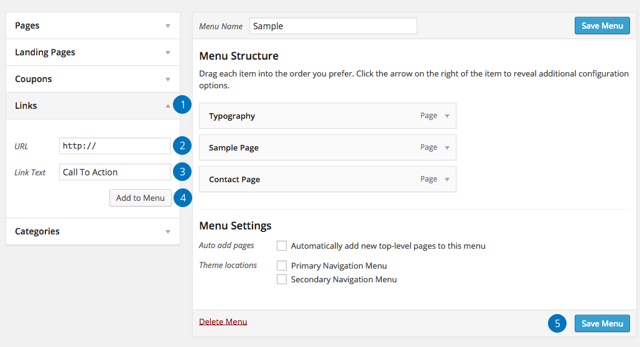
Go to Appearance > Menus, select the ‘Primary Navigation’ or any menu of you have created.
You’ll need to create a custom menu item for the Call To Action button.
- Click the links tab to open it, and add your content as follows:
- Add the URL of the page you want the button to link to, in the URL field.
- Add the button text in the ‘Link Text’ field.
- Click ‘Add To Menu’ to add a new tab to your menu. Arrange the tabs by dragging the tabs up and down with your mouse.
- Click the blue ‘Save Menu’ button.
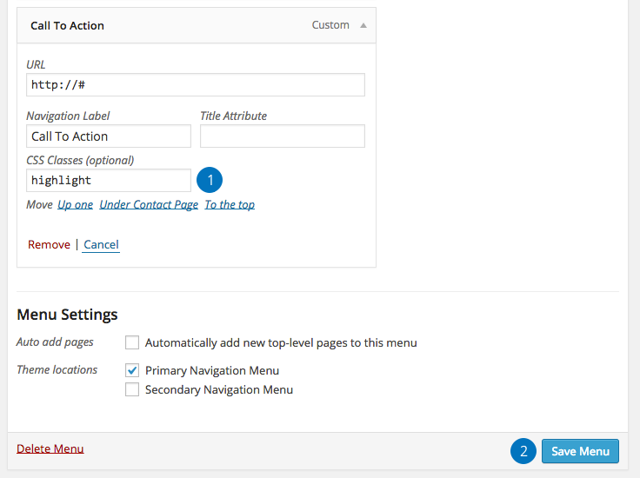
In order to turn this new menu item into a button, you need to add a CSS class to it.
- While still in the Menus page, navigate to the top of your WordPress dashboard and click the Screen Options tab.
- The dropdown menu will display a number of choices. Select CSS Classes from the “Show Advanced Menu Properties” area.
Click on your Call To Action menu item to open up the dropdown.
- You’ll see a new box labeled CSS Classes. Type the class highlight into that field. This will turn the menu item into a button
- Click the blue Save button at the bottom of the page to save your changes.
Now, when you refresh your site, your new Call To Action button will appear at the end of your Navigation Menu.
Homepage Backstretch Image
The Whitespace Pro theme comes with a preinstalled image as the background image of the Home Welcome area just below the header.
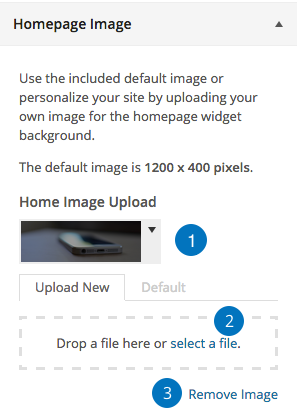
If you prefer to use a different image you can navigate to Appearance > Customize > Homepage Image. A thumbnail sized version of the default, preloaded image will be displayed.
- To set an alternate image in this area click the arrow to the right of the Image thumbnail to display the option to upload a new image for use in this area.
- To select a file to upload from your computer click the “select a file” link. A popup will display allowing you to navigate to the image of your choice using your computer’s file navigation tool.
- To remove the image that is currently configured as the Homepage Image click the “Remove Image” link
Be sure to click the Save & Publish button to preserve your changes.
Notes:
- The Whitespace Pro theme demo uses an image with dimensions of 1200px by 400px for this area.
- The widget used in this content area will overlay the background image when used. Use the included default image or personalize your site by uploading your own image.
Home Page Layout
The Whitespace Pro home page is configured using two (2) widget areas:
- Home Welcome: This area displays content over the Homepage Image, just below the header.
- Footer Social: This area is used to display Social Icons just above the Footer on all pages.
Home Welcome Widget Area
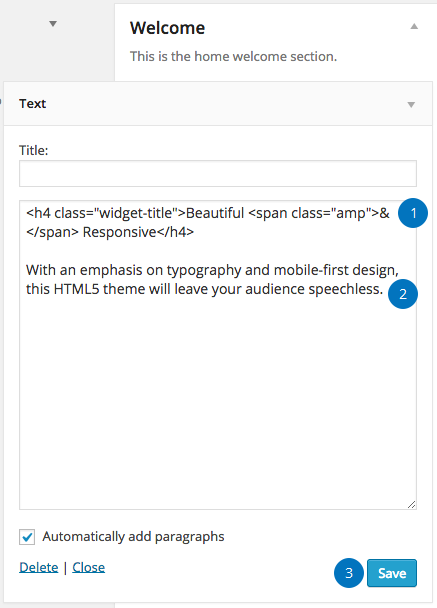
The Whitespace Pro theme demo Home Welcome Content Area displays a simple text message, overlaying the Homepage Image.
The Whitespace Pro theme demo uses text widget in this area.
Go to Appearance > Widgets, click on the Text widget title bar, select the Home Intro widget area, and click Add Widget.
To configure the widget, click the title bar to open it, and add your content as follows:
- Title – Added to the content of the widget in order to achieve the stylized & symbol as seen in the Whitespace theme demo
- Welcome message
- Click the blue Save button to save changes.
Note: If you would like to display the Homepage Image only (with no text), add a blank Text widget to the Home Intro widget area.
Footer Social Widget Area
The Whitespace Pro theme Footer Social Widget Area displays a row of social media icons above the Footer.
The Whitespace Pro theme uses the Simple Social Icons widget to show links to your social profiles.
Go to Appearance > Widgets, click on the Simple Social Icons widget title bar, select the desired widget area from the list, and click Add Widget.
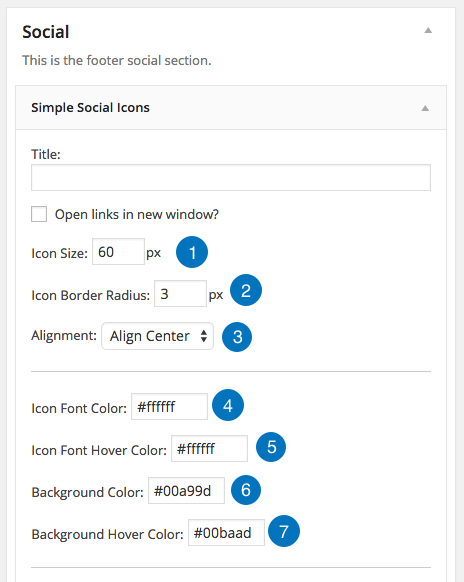
The following are the suggested settings for Simple Social Icons in the Whitespace Pro theme:
- Icon Size: 60
- Icon Border Radius: 3
- Alignment: Align Center
- Icon Font Color: #ffffff
- Icon Font Hover Color: #ffffff
- Background Color: #00a99d
- Background Hover Color: #00baad
Next, you will add your URL to each social network profile in the list you wish to display an icon for. You may add links for the following:
- Dribbble
- Flickr
- GitHub
- Google+
- RSS
- StumbleUpon
- Tumblr
- Vimeo
- YouTube
Once you have completed the widget configuration, be sure to click Save at the bottom of the widget to preserve your settings.
After Entry Widget Area
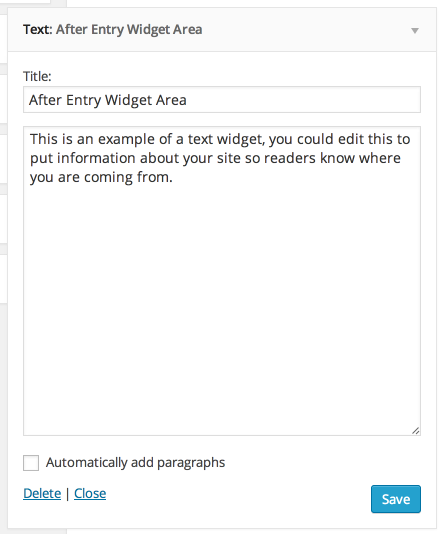
The After Entry Widget Area displays on Single Posts, after the Post Content and before Comments.
Use the text of your choice in this area.
Blog Page Template
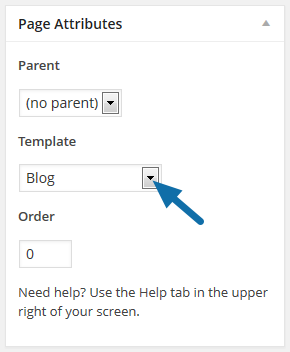
The Blog Page Template can be used to create a page to display your posts.
To use the template, create a new page in your WordPress admin. You may call it Blog, or a different name, such asNews.
You will leave the content area of the page blank.
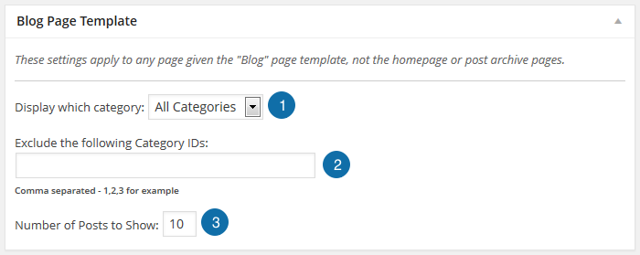
Next, go to Genesis > Theme Settings > Blog Page Template, and configure the content you wish to display on this page.
- You may choose to display All Categories, or a single category, using the drop down.
- You may choose to exclude one or more categories by including the category IDs in the input field.
- You may also choose how many posts you wish to display on this page. Note: This setting is different from the Blog pages show at most setting on Settings > Reading.
Once you have completed your configuration, make sure you click Save Settings at the bottom of the page to preserve your changes.
You may wish to add a link to this page in your navigation menu so your site visitors can find it.
Archive Page Template
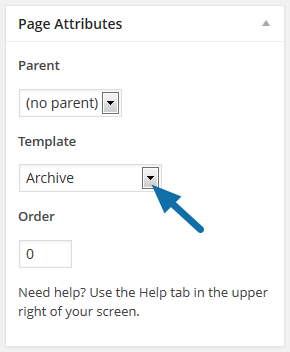
The Archive Page Template is used to create a page to display a list of your site pages, and your post archives by category, month, author, and recent.
To use the template, create a new page in your WordPress admin. You may call it Archive, or any name you wish.
You will leave the content area of the page blank.
You may wish to add a link to this page in your navigation menu so your site visitors can find it.
Landing Page Template
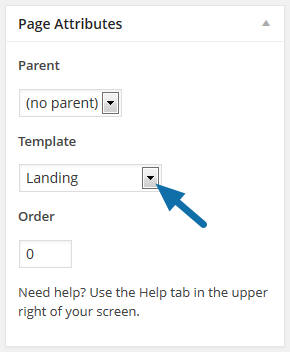
The Landing Page Template is used to create a full-width landing page with no header image.
To use the template, create a new page in your WordPress admin. You may call it whatever you wish.
You will enter the content in the editor that you wish to display on the page.
You may wish to add a link to this page in your navigation menu so your site visitors can find it.
Column Classes
The following image demonstrates how column based content can be displayed on your site.
This type of structured content may be used in posts, pages and inside text widgets to structure content such as that often seen in a welcome message or call to action banner.
How Do I Change…?
Now that you have your theme set up, you may wish to customize some areas, such as the footer text, the post info line, etc.
Note: Unless otherwise indicated, these code snippets should be placed into your theme’s functions.php file at the very end of the file, after all the other code. Some themes already have code snippets in the functions.php file to make changes to these areas, so check the file first before adding any new code. If the code is already in the functions.php file, you should edit the existing code to make your changes.
If you are uncomfortable editing code, the Genesis Simple Edits plugin can help you customize the post info, post meta, and footer credits text.
